
How to use Gelato with Shopify often puzzles new print on demand sellers, yet the whole setup takes less time than brewing a fresh coffee.
You start by installing the Gelato Print on Demand app from the Shopify App Store, connect your Gelato account, pick a product template, add your artwork, set a price and publish.
A recent update worth knowing: the new CreateAI suite is now available to all users on the free plan. It adds tools like magic mockups, fast product launches, and simple store migrations—all aimed at shaving off time from your workflow.
From that point every order travels straight to the nearest Gelato print hub where it is produced, wrapped with your branding and sent off while Shopify logs the payment and tracking for you.
This quick hand-over shortens delivery times, keeps costs clear and lets you grow a catalogue without holding stock.
Keep reading and you will see the finer touches that turn this connection into a profit engine, from personalisation options to report tweaks, so you finish knowing exactly how to use Gelato with Shopify.
60 Second Summary:
- Local production network – Gelato has the largest print on demand network with 140+ print providers across 32 countries. 90% of all orders are produced locally to your customer, meaning shorter delivery times and fewer emissions.
- Gelato + Shopify = Seamless Print on Demand: By integrating Gelato with Shopify, you combine Shopify’s intuitive storefront builder with Gelato’s global, sustainable production network – offering quick, reliable shipping to customers in over 200 countries.
- Easy Setup: Installing the Gelato: Print on Demand app in Shopify takes just a few minutes. Once connected, every order in your Shopify store will be automatically fulfilled by Gelato.
- Wide Product Range: From T-shirts and hoodies to posters, mugs, and greeting cards, Gelato’s catalog boasts over 48 product categories. If you want to stand out, try focusing on art prints – Gelato excels at wall art and premium print materials.
- Personalization Studio: Let customers design their own items by adding names, photos, or text. Gelato automates custom-order production, so you never have to handle files yourself.
- Shipping Made Simple: Gelato provides pre-configured shipping profiles and live shipping rates for transparent, accurate checkout costs.
- Marketing Tips: Use social media, influencers, and email campaigns to attract buyers. Don’t forget to track what sells best and double down on your winning designs.
Why Shopify + Gelato = POD Perfection
Before I cover how to use Gelato with Shopify, I wanted to really quickly explain why the two make a great combo.
After all, Shopify offers dozens of POD apps to choose from, and Gelato integrates with other platforms, like Etsy, WooCommerce, Amazon, and Squarespace.
So, why Shopify? Simply put, it gives you everything you need to build and scale a successful brand, from omnichannel selling options, to strong inventory management and marketing tools.
Shopify is one of the few platforms that integrates with Gelato that offers the ideal blend of simplicity, profitability, and growth opportunities.
So, why Gelato? Simple. Gelato has a ton of unique selling points. It’s one of the most eco-conscious POD vendors on the market (making it great for companies trying to snag sustainable customers).
It also offers consistently amazing printing quality, and ultra-fast shipping (particularly in Europe), so you’ll have no problem keeping buyers happy.
Plus, while Gelato has fewer product options than some competitors, it does have some of the best art and paper products around, and it gives you access to a personalization studio you can integrate into Shopify – so customers can create their own custom products!
All that, and you get global fulfillment, streamlined automation solutions, fantastic sales tools (like the price navigator), and pretty affordable products. What’s not to love?
How to Use Gelato with Shopify: Step by Step
Okay, so if you’ve checked out your options and you’re ready to dive in, I have good news – connecting Gelato and Shopify is super easy.
You don’t even need to fiddle with APIs, because Gelato is available on the Shopify app market.
The first thing you’re going to need is an account with Shopify, and one with Gelato.
If you’re not sure which Shopify plan to use, check out our guide here – I’d recommend the Basic plan for most beginners (the Starter plan doesn’t give you a full website).
If you’re new to Gelato (check out this review), I’d recommend getting started with the free plan. You can always upgrade to a paid plan later for more features.
Just keep in mind you’ll need to pay extra on all plans if you want to use the Personalization Studio (more on that later).
Once you have your accounts, here’s what you’ll need to do:
Step 1: Integrating Shopify and Gelato
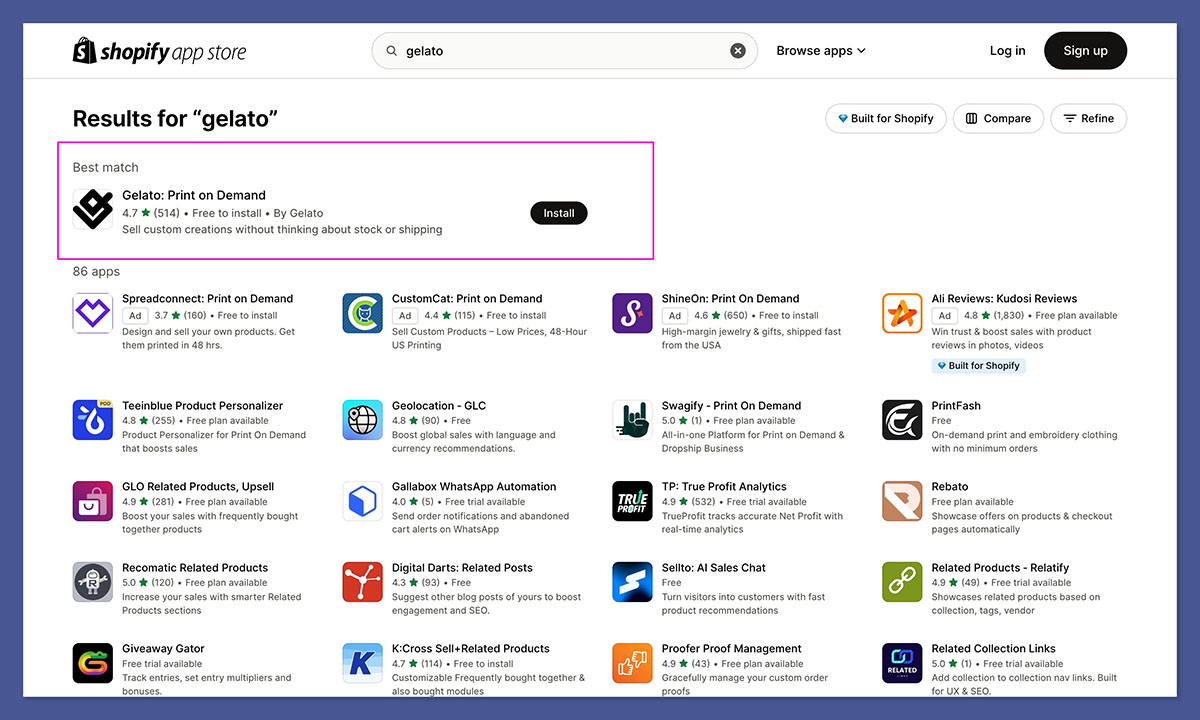
Head to the Shopify app store and search for “Gelato” – the app should be pretty easy to find, and click on “Install”. You’ll be prompted to log into your Shopify account.
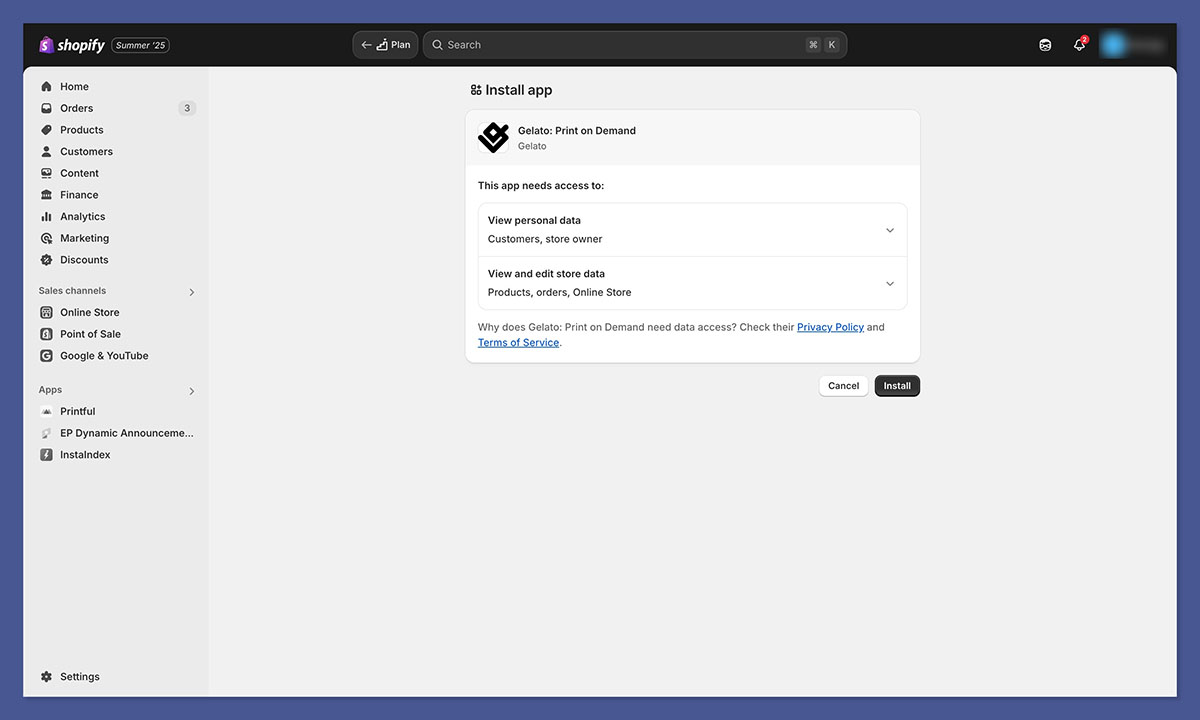
Once the app is installed, you’ll need to follow the instructions you’re given to log into your Gelato account.
As soon as you’re logged in, Shopify will ask you to confirm that you “trust” Gelato’s app, so click “Confirm”.
Gelato’s dashboard will walk you through a few recommended steps, such as choosing your billing method and deciding if you want to manually approve orders or let them go straight into production.
My personal choice is to enable “auto-fulfill” to avoid delays.
During this stage, if you’ve already got designs in your Shopify store from another POD solution, you can sync those to Gelato.
This can save you a ton of time because you don’t have to recreate listings from scratch. If you’re brand new, you can skip this and go straight to creating products within Gelato, which takes us to “step 2”.
Step 2: Choosing Products and Adding them to Shopify
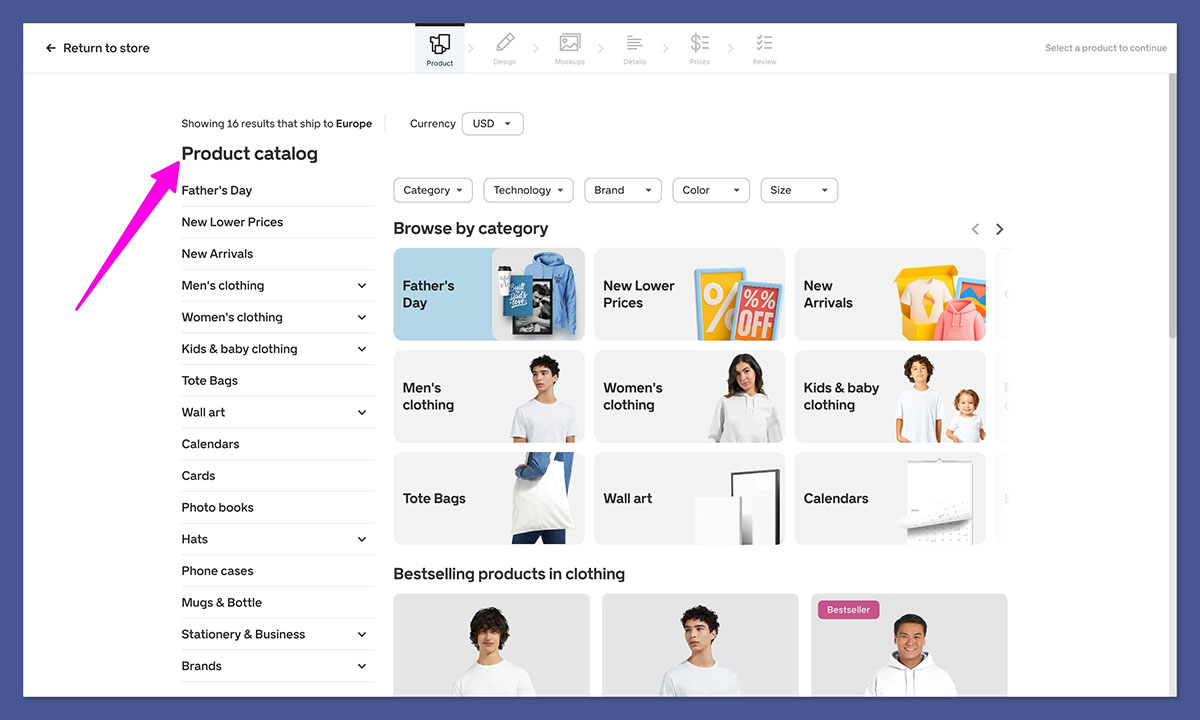
From your Shopify store, click the Gelato app, and open the catalog to start exploring products.
Gelato offers a bunch of options, such as clothing (T-shirts, hoodies, sweaters), home décor (wall art, canvas prints), stationery (greeting cards, stickers), drinkware (mugs, tumblers), and more.
If you’re unsure what to sell, I suggest starting with a few simple staples like T-shirts or posters.
Of course, it’s also worth exploring the areas where Gelato excels.
For instance, Gelato is one of the best POD companies out there for paper products, like posters and prints – you can even create prints on wood and aluminum – for that extra “premium” touch.
To add a product to Shopify, from Gelato, click on your Shopify store in the “Stores” section, and click “Create product”. Choose the product you want to sell, then:
- Upload your design or create one with Gelato’s design editor.
- Position your design exactly where you want it to appear on the product. Don’t worry – the interface will warn you if the design resolution is too low.
- Select any extra branding touches (like custom labels).
- Create mockups of your product (for your Shopify product pages).
- Add all the essential product information: such as your title, description, tags, collection information, pricing, and shipping details.
- Place a sample order so you can see the product bough to life yourself
Quick tip: When you’re setting your prices, remember to factor in production costs (and shipping – if you want to entice shoppers with free shipping options).
Additionally, remember you can create collections on Shopify to keep things neat. You can also “duplicate” items in Shopify, if you want to offer different variations of the same item, by clicking on the three dots next to the product in “My Store”, and selecting “Duplicate”.
Step 3: Navigating Shipping and Fulfillment
Now it’s time to deal with “fulfillment”. The good news if you’re using Gelato with Shopify is that Gelato offers pre-built shipping profiles you can use.
When they’re enabled, they ensure that the shipping cost your customers see at checkout will match what Gelato charges for the same order.
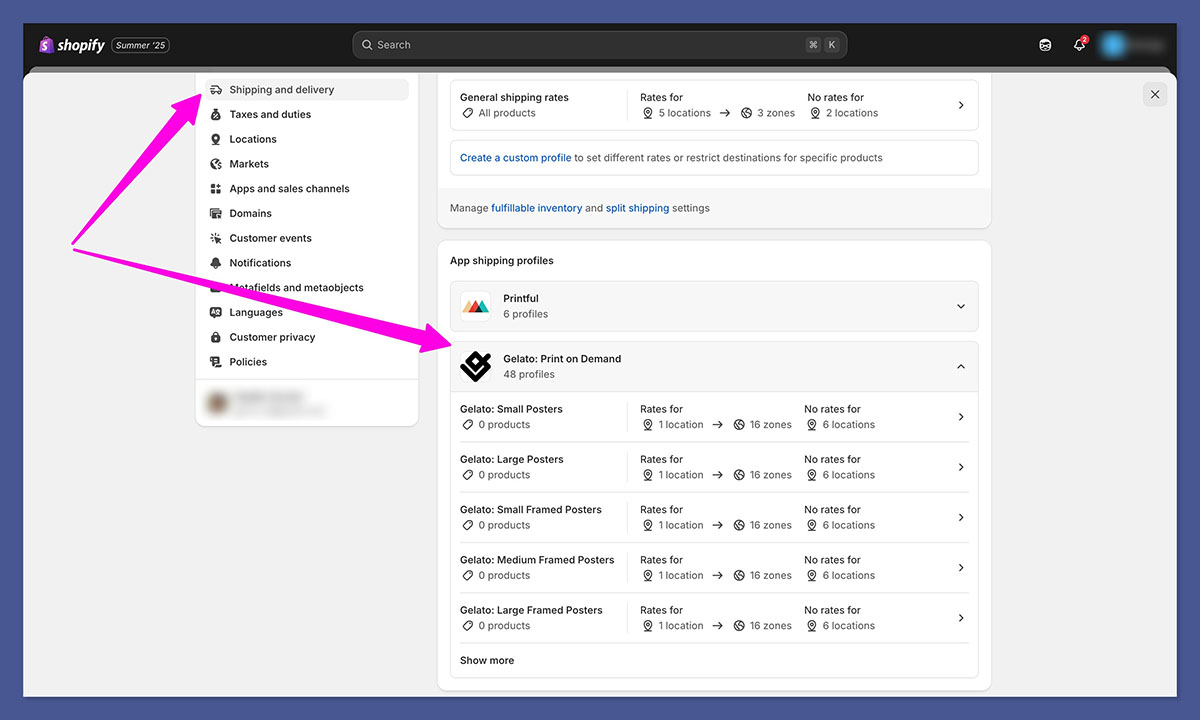
As soon as you connect your Gelato and Shopify accounts, Gelato’s shipping profiles automatically appear in your store.
If you need to find them, click on “Settings” then “Shipping and Delivery” then “App Shipping Profiles” and click on Gelato.
One extra thing I’d recommend doing when setting up your shipping profiles, is using Gelato’s “live shipping rates” feature.
That means your buyers see real-time, dynamically updated shipping costs. I’ve found this especially useful if you ship globally because you won’t have to manually guess shipping costs for various regions.
You will need to enable real-time carrier rates on Shopify (which is available through Shopify Advanced, and Shopify Plus plans automatically).
Remember, depending on your location and your customers’ preferences, you might want to offer “standard” and “express” shipping.
Gelato’s network supports different speeds, so you can easily let the customer decide if they’re willing to pay extra for a quicker delivery.
I’d also advise drawing attention to how eco-friendly Gelato’s shipping processes are on your product pages – just to help boost your chances of sales.
Step 4: Enabling Personalization (Optional)
As mentioned above, you can easily add your own designs to the products you sell through Gelato, by uploading images when you’re “creating” products within the Gelato app.
If you’re struggling to find ideas, you can always experiment with the pre-built assets Gelato offers. Play with fonts, Shutterstock images, and graphics directly from the platform. Or consider hiring a freelancer to help you.
If you really want to give yourself an edge, though, consider investing in Gelato’s “Personalization Studio”.
This allows customers to add their own text, images, or other design elements on top of your product templates.
For example, if you sell T-shirts for birthdays, you could let people add a name, date, or personal message.
There is an extra fee here (a $1 transaction fee on every order)- but it might be worth it. After all, you’ll be able to give customers the freedom to create just about any product they like.
Plus, you don’t have to manually handle custom orders and files – Gelato handles everything.
Of course, you can turn on “manual approval” if you’re worried about customers uploading poor designs – but you can always skip this step too.
To set up “manual order approval” go to the Stores section in your Gelato dashboard and click on your Shopify store.
Click “Edit store details” and switch the “Automatic” setting on “Order Approval” to “Manual”.
Every time a customer places an order then, you’ll see it “pending approval” in your Orders section within the Shopify dashboard. Easy.
Step 5: Optimizing Your Sales
Now, you’re pretty much ready to use Gelato with Shopify, but I do have a few quick tips to share before you jump in:
- Optimize Your Listings: Write clear, engaging product titles and descriptions. Talk about the fabric quality, printing process, or unique design elements. If you’re marketing eco-friendly T-shirts, mention how local production saves on carbon emissions. Remember to use keywords where possible, and always add premium mockups and photos.
- Use Social Media: Take advantage of Shopify’s integrations with social media channels, and get creative promotions. Share lifestyle photos and videos of your products on Instagram and TikTok, run paid ads on Facebook. Ask your customers to get involved by inviting them to contests where they can win prizes for sharing photos of them wearing your products
- Expand Across Channels: Make the most of all of your marketing options. Work with influencers to give your store’s presence a quick boost online. Take advantage of email marketing to drive repeat sales, or use Shopify’s chat tools to connect with customers in real-time on your store. Experiment with blogs and SEO, as well as PPC campaigns.
- Get Creative: Invest in a few apps for Shopify, such as upselling and cross-selling applications, pop-up creators, and banner ads. Consider running seasonal campaigns for holidays or major events – with print on demand, you can introduce new products to your collection risk-free.
As always, remember to monitor the results of your campaigns and be ready to pivot based on what you learn. The key to great marketing is experimentation (and constant optimization).
Using Gelato with Shopify: It’s Simple
If you’re planning on jumping into the incredible print on demand market, it’s hard to find a duo better suited than Shopify and Gelato.
You get all the benefits of Shopify’s highly scalable ecosystem, combined with a print on demand provider that prioritizes sustainability, customer service, and quality.
All that, and the integration process only takes a few minutes.
A few final tips?
- Start Small, Then Expand: Don’t overwhelm yourself by creating hundreds of products right away. Begin with a few strong designs, analyze how your audience responds, and then scale up.
- Lean Into Personalization: If you really want to stand out- and charge a premium- enable customization features. Buyers love the power to create something unique for themselves or a loved one.
- Watch Your Margins: Keep an eye on total product cost (base cost + shipping + personalization fees) so you can price strategically. If you plan to run big promotions or collaborate with influencers who require a commission, bake that into your pricing.
- Embrace Sustainability: Don’t be shy about highlighting Gelato’s local production approach. Many customers actively look for eco-friendly businesses and are happy to pay a bit extra for them.
There you have it – you’re ready to get out there and start selling amazing products with Shopify and Gelato. Good luck, and happy selling!